
Creating a web based class involves 3 steps after you have obtained the course content as a zip file in SCORM format.
STEP 1: Add content to CULearn
STEP2: Create the course
STEP3: Setup a New Web-Based Class and attach content to class activity
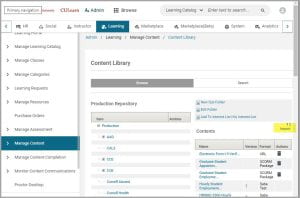
Step 1: Add content to CULearn content library
- On the homepage, click Admin, then Learning Admin and then on the left hand menu select Manage Content>Content Library.
- Go to your folder(designated for your college/unit) under Production Repository and select it. Then click Import.
- Enter the name of the content and under Content Format select SCORM Package.
- Enter a Version Number,this is helpful in case you revise content and want to add revised content.
- Click Next and then click Choose File Button to select the zip scorm file. Then click Import.
- Once content is imported, click Preview to make sure the content launches and play through to test the content.
Step3: Setup a New Web-Based Class
- Click Learning Catalog
- Search for the course you created
- Click New Class next to the course you are adding the class to
- Select Delivery Type (Web Based) and click Next
- Enter the Class ID. The class ID consists of the course acronym and number. The number is formatted as WBTYYYMMDD with no spaces. For example, an EH&S class may have a class ID of EHS1074-WBT20160513
- Enter the Description
- Enter the Language, if the language is different from the default language you selected for the course.
- Enter the Class Price, if there is a fee for the class. The class price will default to the price you set for the Course, if you entered a course price
- Enter the Available from date. This is the date the class will be available for registration
- Click Finish.
Add the Content for the Class
After adding the class, add the content for the web-based training.
- Click the Activities tab
- Click Add Activities and select Attach Content. A new window will open
- Search for the content to be added. Select the content
- Click Add Activity Details. A new window will open
- Click Save. You will now see the activity has been added under the Activities Heading
- Click Save and Publish.